Showing posts with label Make It Monday. Show all posts

Monday, July 11, 2011

Make It Monday: Bubbles of Fun!


I double dog dare you to celebrate summer with this easy Make It Monday project for giant homemade bubbles!


I spotted this idea from Down Memory Lane over at the lovely Kirstikoo blog.  It looks like it would be so simple, and so much fun!  Click here to see just how it’s done.

And in other Make It Monday news, it’s Make It Madness week at Michaels, with great deals each day this week.  You can check out their specials and project ideas here!


Cheers!
Betsey


Monday, December 27, 2010

Make It Monday: Make It Organized!

Yesterday evening I sent Christmas packing.  We spent a delightful month together, which concluded with a fabulous Christmas celebration on Saturday.  But when I woke up Sunday morning and realized Christmas had no intent on leaving, I knew I had to take matters into my own hands.  That’s when I started packing Christmas’ belongings and sent him on his merry way.  Even though Christmas is festive and bright and magical and wonderful, he also leaves his stuff all over my house, which doesn’t lend itself very well to the whole ‘neat and tidy’ thing I like to have going on.  So, we said our goodbyes, and off Christmas went, leaving me with a home that’s almost back to normal.

I wasn’t always like this, all neat and tidy.  Ten years ago, when my husband and I first met, he claims he couldn’t even tell what kind of flooring I had at the time.

 
Over the years, I slowly evolved into wanting my home to be more organized, and it’s literally taken me years to get it right.  Or at least better.  Now that I run a business from home, I find that it’s even more important to keep my house clean and organized.  If it’s not, it becomes a distraction to me while I’m trying to work and I become far less productive.

If you haven’t jumped on the organization bandwagon just yet, I wanted to share three simple tips that have helped me become more organized over the years.

#1:  Seek (professional) help.
What I mean by this is look for books, magazines, websites and stores that offer organizational tips and tricks that you can peruse to find inspiration that suits you.  Compile your favorites (neatly, of course!) so that you can refer back to them when you need motivation to continue this ongoing project.  Here are two of my faves:
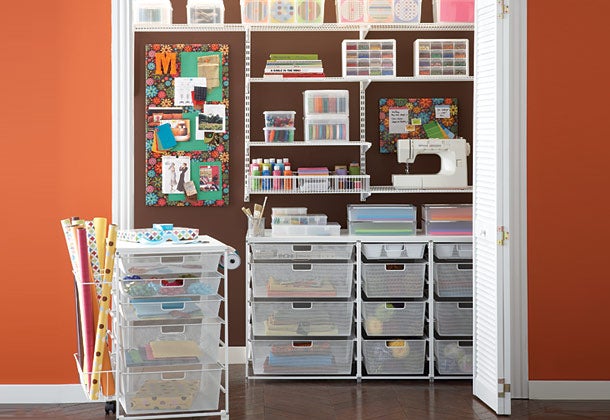
The Container Store not only offers a fabulous selection of products to organize every space in your home, but their site features beautiful images of organized heaven in their Inspirational Spaces section, plus a whole section with expert tips and ideas to get you started.

I heart the arts and crafts closet from www.containerstore.com
 
I also love Get Organized Now!, a site created by professional organizer, Maria Gracia.  I’ve been following this site forever.  Do yourself a favor and sign up for the weekly newsletter for organizing inspiration delivered right to your inbox.  In addition to tips and tricks offered by Maria and her readers, one of my favorite features of the site is the monthly organizing checklist (click here to see what December’s checklist looked like).  It is my dream to one day complete an entire list within the month it’s featured.  I don’t know how she does it.  She’s seriously the Martha of home organization.  Adore.

#2:  Start somewhere.  Anywhere.
Now that you’ve found inspiration, it’s time to go for it.  I know the idea of organizing your entire home can be extremely overwhelming, but the thought of organizing just one junk drawer or just one closet shelf?  Not as scary.  My advice to you is to just start anywhere, and take on one little project at a time.  Here’s an example:  my refrigerator is a mess.  I haven’t had taken the time to clean it out for a while (no need to actually disclose how long it’s been), and now it’s a huge project.  So, rather than stressing over how much work it’s going to be to clean out the whole thing, I’m going to tackle one shelf or drawer at a time.  Today, I’m going to clean the top shelf.  See?  That doesn’t seem so bad!

#3:  Make it make sense.
This may be my most simple tip, but it has the biggest reward.  When organizing your space, be sure to put similar things together, and put them closest to where they’ll be used.  In my mom’s rather large kitchen, she has her plates and silverware in the cupboards and drawers closest to the dining room, for quick access when setting the table.  I have mine closest to the dishwasher because I’m lazy like that.  The point is, put the stuff where you’ll use it most, where it makes sense to you.  This will save you so much time in the end, from having to run from one end of the house to the other, trying to find what you need.

Wonderful organizing goodies from www.ikea.com

Now, you’re probably wondering what this all has to do with Make It Monday… the truth is, I just. can’t. make. anything else. this year.  So I’m inviting you to join me in making it organized instead.  No hot glue burns required.


Cheers!
Betsey

Monday, December 13, 2010

Make It Monday: Pretty Tulle Wreath


Happy (Make It) Monday!  Today’s project is a super simple, super pretty wreath (and we all know how much I love wreaths!) that you can easily make in time for Christmas day.


I first spotted this wreath over at Flamingo Toes, where she made a very cute black and pink version for Halloween.  What I love, love, LOVE most about this wreath is how versatile it is.  Inspired by a black tulle wreath for Halloween, I made a white tulle wreath for the winter holidays.  But I could see this made with pink tulle for Valentine’s Day, green tulle for St. Patty’s Day, red tulle for the 4th of July, gold tulle for Thanksgiving… you could even make one in your wedding colors, add a monogram, and use it as part of your wedding décor!

So, let’s get to it!

I should start by saying that I know I mentioned that this project was super simple, but I should probably add that it is time consuming, so make it for someone you really like.  I made mine for my sis in law, so it was time well spent. 

First, start off with a basic foam wreath base.  Mine was green foam and I purchased it at the dollar store.  I then wrapped an inexpensive white ribbon around the foam just so I’d have a white base to start with, without actually having to break out the spray paint.  Hot glue and pin the white ribbon in a few spots as you wrap the wreath, just to make sure it stays put. 

Then, start cutting your tulle.  I had a roll of 6” wide tulle that I found in the bridal section of my craft store, and I think(?) I used about 75 feet of the 100 foot long roll – more or less.  Cut pieces into 13” lengths.  You’ll need a lot of these.  Like, a LOT.  So just start cutting, and then keep cutting, and when you think you have enough, cut some more.

Then, start tying!  Tie each piece of tulle onto the wreath with a basic knot, spreading out the ends of the tulle as you go.  Continue tying the tulle onto the wreath, pushing the pieces together to fully cover the wreath form.

Eventually, after much cutting and tying, you’ll have a beauty like this:

 
I have to admit, I love the wreath just like this – it has a simple elegance that I adore.  But I wanted to make it extra special for the holidays, so I added three shimmering snowflake ornaments to it.  All I did was hot glue a small safety pin to the back of each snowflake ornament, and then stuck the pin right into the tulle.  This way, they can repositioned, or removed altogether.  You could use this same trick to add other holiday ornaments, a ribbon, a feather boa like at Flamingo Toes, or whatever else you’d like!

I love it so much that I’m considering making one for my very own!  If you want to make your own, but need a little more instruction, just click here to see the great tutorial provided by Flamingo Toes.


Cheers!
Betsey

Monday, November 29, 2010

Make It Monday: Makeovers!


If you’re anything like me, you surely have at least a few items that always go back in the box when you unpack your holiday décor.  These are things that you’ve had forever, that look like they’ve seen better days, that don’t match what you have now, and they just seem better suited for decorating the inside of the holiday storage box than your home.

I’ve been accumulating a few of these things for a while now, and this year, in keeping with my “simplified holiday” theme first seen here, I decided it was time to give these things a makeover.  That’s right, it’s Makeover Day at b.bar!

First, I gathered up all the items in need of a new look.


Then I took to the garage for some spray paint magic.  I know I originally said I was keeping with a basic white palette, but my white spray paint was not covering at all the silver spray paint looked so pretty, that I decided silver was a nice accent to the white palette.

Just in case you’re new to the spray paint phenomenon, here are a few tips to keep in mind:

  1. I never always clean the items thoroughly before painting.
  2. Invest in a spray paint handle, available at most hardware shops.  It just snaps onto the can and will save your index finger from a great deal of pain, and will prevent paint from getting all over your hand.
  3. Shake the spray paint can excessively before using.  And when you think you’ve shaken it enough, turn it upside down and shake it some more.  And while you’re painting, it won’t hurt to pause every few minutes to shake it again.
  4. Spray in short, even strokes from side to side.  Remember that it’s better to do multiple thin coats then have drip marks from trying to do a coat that’s too heavy.
  5. If the nozzle clogs, turn the can upside down and spray until the stream becomes clear.  This should clear the inside of the nozzle, then just wipe the front of the nozzle with a cloth.
After all that, you can sit back and celebrate all your hard work as you admire your “brand new” stuff!  Everything now has a fresh, cohesive, sparkling look, and I can't wait to display my new holiday décor.


What are you making over this season?


Cheers!
Betsey


Monday, October 25, 2010

Make It Monday: Foam Tombstones


It’s Make It Monday here at b.bar, and today we’re talking tombstones!  Remember those frightening tombstones you saw in yesterday’s post about outdoor Halloween decorations?  


I’d been dreaming of these ever since I saw them made on a Halloween special on HGTV several years ago.  Now that we finally have a yard to decorate, I couldn’t wait to try it out!
 
You’ll need the following materials and tools:
  • Insulation foam – buy the 1.5” or 2” thick foam available at home improvement stores.  You’ll need a 2 ft. x 2 ft. square for each tombstone.
  • Wooden dowels, cut into 8-10” lengths
  • Drill and drill bit in same size as dowels
  • Serrated knife
  • Grey and black spray paint
  • Black permanent markers
  • Black acrylic craft paint
  • Small paintbrushes for lettering and details
Start by drawing the tombstone outline onto the foam.  Search for images online for inspiration.  Cut out each tombstone using a serrated knife.  Enjoy the foam “snow” that will cover you from head to toe.

Next, lightly paint the tombstones with grey spray paint, then accent with black spray paint to get a weathered stone look.  While this is drying, start sketching out what you want each tombstone to say.  Again, you can search online for inspiration, or come up with your own clever ones.  We even used silly references to tv shows we watch in coming up with ours!  Once the spray paint is dry, add the lettering and details you’ve decided on with black permanent markers, black paint, or a combination of both!  I started out hand-painting each letter, but quickly grabbed my trusty Marks-A-Lot when I realized how time consuming painting was going to be.  Once I’d drawn on the basic lettering, I went back to add more detail with the paint, including the drips and the faux cracks in the stone.

Finally, using a drill bit the same width as the dowels, drill holes into the bottom of the tombstone – make sure they are straight in, otherwise your dowels will poke out through the side.  Insert the dowels into the holes, then into the ground.  I had to use my drill again here to drill holes into the hard Arizona soil for the dowels to go into.

And that’s it!  While this project does take some time initially, it’s super simple and inexpensive to make, and will last year after year.


To see HGTV’s full tutorial on these foam tombstones, click here.  Now go make it!

betsey