Thursday, December 30, 2010

Whatever Wednesday: Thursday Edition


You ever have one of those days that goes by so quickly that you’re crawling into bed when you realize something you forgot to do that day?  Well… yesterday was one of those, and it was about 11:00 PM when it occurred to me that I didn’t post for Whatever Wednesday.  Oops!

I think it’s only fitting that I say, whatever!  In my world, Whatever Wednesday can be posted at anytime, so here you go!

This will be the last post of 2010 (epic, I know) so I just want to wish everyone a safe and happy New Year’s celebration full of confetti and glitter!  See you in 2011 for more b.bar fun!

someday i'd like to see this in person!

 
Cheers!
Betsey

Monday, December 27, 2010

Make It Monday: Make It Organized!

Yesterday evening I sent Christmas packing.  We spent a delightful month together, which concluded with a fabulous Christmas celebration on Saturday.  But when I woke up Sunday morning and realized Christmas had no intent on leaving, I knew I had to take matters into my own hands.  That’s when I started packing Christmas’ belongings and sent him on his merry way.  Even though Christmas is festive and bright and magical and wonderful, he also leaves his stuff all over my house, which doesn’t lend itself very well to the whole ‘neat and tidy’ thing I like to have going on.  So, we said our goodbyes, and off Christmas went, leaving me with a home that’s almost back to normal.

I wasn’t always like this, all neat and tidy.  Ten years ago, when my husband and I first met, he claims he couldn’t even tell what kind of flooring I had at the time.

 
Over the years, I slowly evolved into wanting my home to be more organized, and it’s literally taken me years to get it right.  Or at least better.  Now that I run a business from home, I find that it’s even more important to keep my house clean and organized.  If it’s not, it becomes a distraction to me while I’m trying to work and I become far less productive.

If you haven’t jumped on the organization bandwagon just yet, I wanted to share three simple tips that have helped me become more organized over the years.

#1:  Seek (professional) help.
What I mean by this is look for books, magazines, websites and stores that offer organizational tips and tricks that you can peruse to find inspiration that suits you.  Compile your favorites (neatly, of course!) so that you can refer back to them when you need motivation to continue this ongoing project.  Here are two of my faves:
The Container Store not only offers a fabulous selection of products to organize every space in your home, but their site features beautiful images of organized heaven in their Inspirational Spaces section, plus a whole section with expert tips and ideas to get you started.

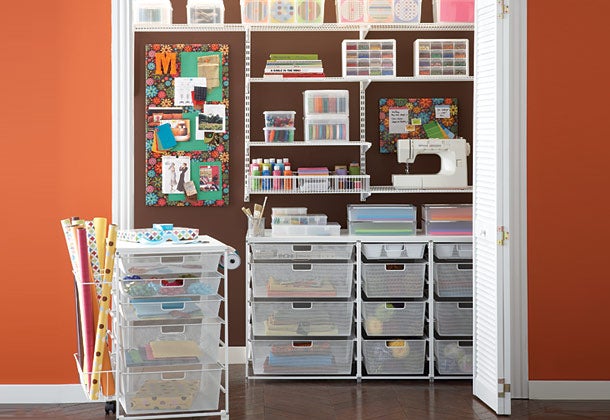
I heart the arts and crafts closet from www.containerstore.com
 
I also love Get Organized Now!, a site created by professional organizer, Maria Gracia.  I’ve been following this site forever.  Do yourself a favor and sign up for the weekly newsletter for organizing inspiration delivered right to your inbox.  In addition to tips and tricks offered by Maria and her readers, one of my favorite features of the site is the monthly organizing checklist (click here to see what December’s checklist looked like).  It is my dream to one day complete an entire list within the month it’s featured.  I don’t know how she does it.  She’s seriously the Martha of home organization.  Adore.

#2:  Start somewhere.  Anywhere.
Now that you’ve found inspiration, it’s time to go for it.  I know the idea of organizing your entire home can be extremely overwhelming, but the thought of organizing just one junk drawer or just one closet shelf?  Not as scary.  My advice to you is to just start anywhere, and take on one little project at a time.  Here’s an example:  my refrigerator is a mess.  I haven’t had taken the time to clean it out for a while (no need to actually disclose how long it’s been), and now it’s a huge project.  So, rather than stressing over how much work it’s going to be to clean out the whole thing, I’m going to tackle one shelf or drawer at a time.  Today, I’m going to clean the top shelf.  See?  That doesn’t seem so bad!

#3:  Make it make sense.
This may be my most simple tip, but it has the biggest reward.  When organizing your space, be sure to put similar things together, and put them closest to where they’ll be used.  In my mom’s rather large kitchen, she has her plates and silverware in the cupboards and drawers closest to the dining room, for quick access when setting the table.  I have mine closest to the dishwasher because I’m lazy like that.  The point is, put the stuff where you’ll use it most, where it makes sense to you.  This will save you so much time in the end, from having to run from one end of the house to the other, trying to find what you need.

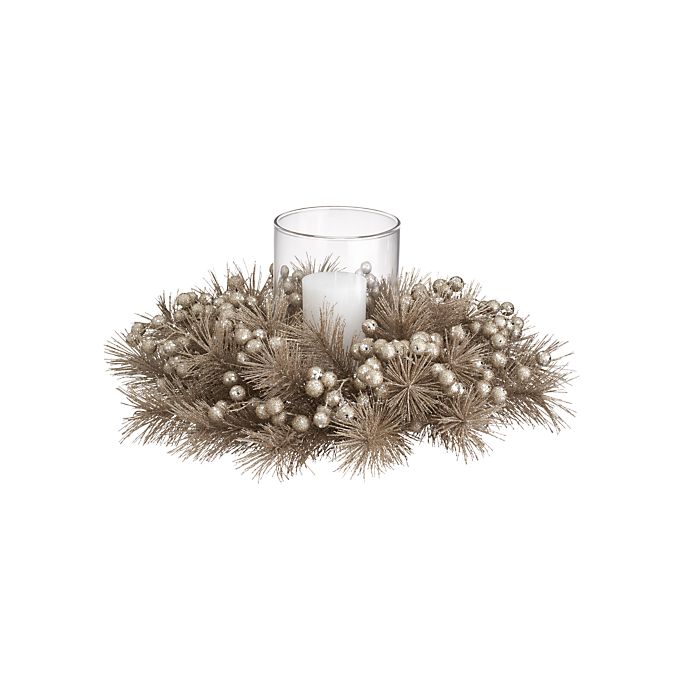
Wonderful organizing goodies from www.ikea.com

Now, you’re probably wondering what this all has to do with Make It Monday… the truth is, I just. can’t. make. anything else. this year.  So I’m inviting you to join me in making it organized instead.  No hot glue burns required.


Cheers!
Betsey

Thursday, December 23, 2010

Party Time Thursday: Celebrate!


Today isn’t as much about party time as it is about celebrating.  I’m guilty of this, so I know that a lot of you must be like me – you get so busy working on your holiday projects that you forget to really celebrate the season.  So I just want to remind myself you to enjoy it.  And it doesn’t matter what you celebrate; what matters is that you take the time to do so.  It’s important for your health.  Doctors should prescribe this treatment.

I am celebrating today because I finished all four of my holiday gift projects just in time!  And I could not be more pleased with how they all turned out.  But I can’t reveal them – some recipients may be reading now…

So merry whatever, happy everything, and a joyous celebration to all!


Cheers!
Betsey

Tuesday, December 21, 2010

Serve It Up Tuesday: Festive Christmas Cocktails


This Christmas, while you’re opening gifts and making a delicious feast, why not enjoy a festive Christmas cocktail while you’re at it?  Try one of these simple, yummy concoctions to warm up your holiday!

Pumpkin Pie Martini
Mmmm… as tasty as the real thing, and no having to fight anyone over the last piece.

Photo from www.hgtv.com
 
Ingredients:
½ oz. vanilla vodka
1 oz. pumpkin spice liqueur
½ oz. Kahlua
½ oz. Butterscotch Schnapps
½ oz. half and half
Crushed graham crackers
Cinnamon stick for garnish

Add all liquid ingredients in a shaker filled with ice.  Shake and strain into a large martini glass rimmed with crushed graham crackers. Garnish with a cinnamon stick.  Makes one individual serving.


White Sangria
Because we all know how much I love sangria.  Easy to make, even easier to drink.

Photo from www.hgtv.com
 
Ingredients:
1 bottle chilled dry white wine
1 bottle chilled champagne
3 oz. Damiana liqueur (substitute Triple Sec and a splash of vanilla extract if you don’t have this)
2 freshly sliced pears
2 freshly sliced apples
20 whole cloves
1 tsp. ground nutmeg

In a large pitcher, add the pears, apples, cloves and nutmeg.  Add the Damiana and stir.  Add the wine and stir.  Refrigerate overnight to let the flavors soak into the fruit.  When you’re ready to serve, pour in the champagne, stirring it slowly into the mixture.  Serve over ice, along with a few slices of the pears and apples.  Makes 8 to 10 servings.


Cocoa Raspberry Heaven
Oh, I like the sound of this already.

Photo from www.hgtv.com
 
Ingredients:
1 oz. plus 1 tsp. raspberry liqueur (Chambord is lovely)
1 oz. white crème de cacao
8 oz. hot cocoa
Whipped cream
Fresh raspberries for garnish

Pour raspberry liqueur and white crème de cacao in a mug.  Add hot cocoa and stir.  Top with a dollop of whipped cream.  Drizzle the teaspoon of raspberry liqueur on top of the whipped cream and top with fresh raspberries.  Makes one individual serving.


Caramel Apple Pie
Yes, please, I’ll have that.

Photo from www.hgtv.com
 
Ingredients:
1 ½ oz. vodka or tequila (love the variety!)
1 oz. Butterscotch Schnapps
1 ½ oz. apple cider
1 tsp. fresh lemon juice
Apple slice for garnish
Crushed graham crackers

Add all liquid ingredients in a shaker filled with ice.  Shake and strain into a glass rimmed with crushed graham crackers. Garnish with an apple slice.  Can also be served over ice.  Makes one individual serving.

I found these Christmas cocktail recipes on HGTV.com, and featured the ones that seemed to be the most simple and most tasty!  For these recipes, and several more, you can see the article by clicking here.


Cheers!
Betsey


Wednesday, December 15, 2010

Whatever Wednesday: Holiday Card Displays


The holiday cards are arriving in full force!  If you’re tired of the old “cover the entire fridge in cards” technique for displaying these sentiments, then you might try something different this year.  Here are three simple ways to display your favorites:

Just by embellishing a pretty ribbon, you’ll have a super simple way to show off those cards.  Click here to see how this was done at She’s Crafty.

Photo from www.choosecraftiness.blogspot.com
 
Try this festive way to display cards on your kitchen cabinets, which almost makes the cabinets look like gifts, too!  Click here to visit Tres French Hens to learn how.

Photo from www.tresfrenchhens.blogspot.com

And how could I have a holiday feature without a wreath?  Well, Martha Stewart’s got one!  I love how easy this wreath is to put together, and how functional it is this time of year.  Click here for Martha’s instructions.

Photo from www.marthastewart.com
 
How will you display your holiday cards this season?


Cheers!
Betsey

Monday, December 13, 2010

Make It Monday: Pretty Tulle Wreath


Happy (Make It) Monday!  Today’s project is a super simple, super pretty wreath (and we all know how much I love wreaths!) that you can easily make in time for Christmas day.


I first spotted this wreath over at Flamingo Toes, where she made a very cute black and pink version for Halloween.  What I love, love, LOVE most about this wreath is how versatile it is.  Inspired by a black tulle wreath for Halloween, I made a white tulle wreath for the winter holidays.  But I could see this made with pink tulle for Valentine’s Day, green tulle for St. Patty’s Day, red tulle for the 4th of July, gold tulle for Thanksgiving… you could even make one in your wedding colors, add a monogram, and use it as part of your wedding décor!

So, let’s get to it!

I should start by saying that I know I mentioned that this project was super simple, but I should probably add that it is time consuming, so make it for someone you really like.  I made mine for my sis in law, so it was time well spent. 

First, start off with a basic foam wreath base.  Mine was green foam and I purchased it at the dollar store.  I then wrapped an inexpensive white ribbon around the foam just so I’d have a white base to start with, without actually having to break out the spray paint.  Hot glue and pin the white ribbon in a few spots as you wrap the wreath, just to make sure it stays put. 

Then, start cutting your tulle.  I had a roll of 6” wide tulle that I found in the bridal section of my craft store, and I think(?) I used about 75 feet of the 100 foot long roll – more or less.  Cut pieces into 13” lengths.  You’ll need a lot of these.  Like, a LOT.  So just start cutting, and then keep cutting, and when you think you have enough, cut some more.

Then, start tying!  Tie each piece of tulle onto the wreath with a basic knot, spreading out the ends of the tulle as you go.  Continue tying the tulle onto the wreath, pushing the pieces together to fully cover the wreath form.

Eventually, after much cutting and tying, you’ll have a beauty like this:

 
I have to admit, I love the wreath just like this – it has a simple elegance that I adore.  But I wanted to make it extra special for the holidays, so I added three shimmering snowflake ornaments to it.  All I did was hot glue a small safety pin to the back of each snowflake ornament, and then stuck the pin right into the tulle.  This way, they can repositioned, or removed altogether.  You could use this same trick to add other holiday ornaments, a ribbon, a feather boa like at Flamingo Toes, or whatever else you’d like!

I love it so much that I’m considering making one for my very own!  If you want to make your own, but need a little more instruction, just click here to see the great tutorial provided by Flamingo Toes.


Cheers!
Betsey

Thursday, December 9, 2010

Party Time Thursday: Perfect Holiday Party Favors


With so many of us hosting holiday parties this year, I wanted to highlight some simple, festive party favor ideas.  Favors are a great way to thank your guests for coming, and to give them something to remember the occasion by, all while enhancing your party’s theme/décor.  And you know I love that!
 
Consider one of these if you’re having a cocktail party to celebrate the holiday season:

This snowflake wine bottle stopper available from Favor Affair is so sparkly!
Add one to a bottle of wine, and you’d have an excellent hostess gift, too.

Photo from www.favoraffair.com

I love the idea of filling the mini cocktail shaker from Beau-coup with 
holiday candies wrapped in a shimmering foil, and adding a matching bow.

Photo from www.beau-coup.com

For pretty place card holders that double as favors, try one of these for your holiday dinner:

The silver snowflake ornament from Favor Affair can be taken home
for guests to hang on the tree, or to display as a mini picture frame.  

Photo from www.favoraffair.com
 
Guests can use this Christmas tree place card holder from Favor Affair 
in their office as a photo or note holder during the holidays.

Photo from www.favoraffair.com

It would be so convenient to place a basket of favors near the door so each guest can grab one on their way out:

These snowflake coasters from Favors by Serendipity will be an elegant addition
to your guests’ holiday décor, and they’ll think of you each time they’re used.

Photo from www.favorsbyserendipity.com
 
Add a snowflake bookmark, like this one from Favor Affair, to a holiday keepsake book to make a treasured favor for your guests.

Photo from www.favoraffair.com

Or consider sending your guests home with a treat of their own:

These tiny snowflake favor boxes available at Favor Affair 
would be delightful filled with holiday goodies.

Photo from www.favoraffair.com

Adorable cupcake wrappers from Favors by Serendipity 
would make any cupcake look extraordinary.

Photo from www.favorsbyserendipity.com
 
And with so many decorative options available from Wilton, you can 
make holiday treats look fabulous - think edible glitter! 

Photo from www.wilton.com

Customize any of these with a pretty ribbon and a handmade gift tag, and you’ve got a perfect party favor!


Cheers!
Betsey


Tuesday, December 7, 2010

Serve It Up Tuesday: Dreidel, Dreidel, Dreidel!

Oh, dreidel, dreidel, dreidel, I made it out of… chocolate?  And marshmallows?  Now that’s a game I can get into!

Photo from www.marthastewart.com

These little treats are so simple to make, and are so yummy!  Click here for the instructions from Martha Stewart, and be sure to read the comments on that page for kosher/vegetarian solutions.  Happy Hanukkah!


Cheers!
Betsey

Wednesday, December 1, 2010

Whatever Wednesday: A Love Affair with Wreaths


If you’ve been following b.bar for long, you’ve probably noticed my fondness for wreaths.  It’s a love affair, really.  I love them.  I.  LOVE.  Them.  I even launched b.bar with a line of hand decorated wreaths, which can be seen here at my etsy shop (wink, wink).

However, wreaths all over the world have been contacting me, asking me to spread the word that they aren’t just for doors anymore.  Sure, wreaths don’t mind being door décor, but they just want everyone to know that you can display them in so many other ways!  So, as the self-appointed Wreath Maven, I felt it was my duty to share with you some creative ways to display these wonderful wreaths.

On a shelf…

Photo from www.potterybarn.com

Above your mantel…

Photo from www.potterybarn.com

On a window…

Photo from www.marthastewart.com

Photo from www.ballarddesigns.com

As a centerpiece…

Photo from www.crateandbarrel.com

On your banister…

Photo from www.marthastewart.com

On a mirror…

Photo from www.marthastewart.com

Displayed in multiples…

Photo from www.marthastewart.com

And as a chandelier…

Photo from www.marthastewart.com

And if you’re wondering how to hang these lovelies, Martha Stewart’s site offers some great tips for hanging wreaths here!

Anyway, the point is, think outside of the traditional when displaying these fabulous wreaths around your home this holiday season.  And speaking of fabulous, the wreaths available at my shop are that and more.  OK, I promise, no more shameless plugs (today anyway).


Cheers!
Betsey